26 Jun 2019
In the second part of his short series of tips designed to help get the most out of your clinical pathology submissions, Nick Marsh offers a few notes on how to present your samples.
Nick Marsh
Job Title
Blood smear for hematology microscopic examination. Image © toeytoey / Adobe Stock
“Cellularity is poor, and preservation is poor.”
As openings to literary works go, it may not have the skill of “It was the best of times, it was the worst of times” or “The sky above the port was the color of a television, tuned to a dead channel”, but it certainly has an emotional impact on its readers as vets realise they’re going to have to tell their clients that their sample isn’t going to tell them the answers.
This is the second in an occasional series on advice about how to get the most out of your clinical pathology submissions (part one offered tips on how to avoid poorly preserved samples). Today, we’re going to be looking at how to get the best chance of getting a nicer opening to your personal work of literature, by talking about cellularity.
Perhaps not unfairly, most respectable cells (as well as a fair number of unrespectable ones) would rather remain inside the body that they’re attached to, rather than being hoicked out and stuck on to a slide.
Some cells are better than others at this; mesenchymal cells, the cells of the connective tissue, are particularly tenacious types (I suppose there’s a clue in the name) and are tricky to pull up into the hub of a needle. Down at the other end of the scale, some cells, often “round” cells (a strange designation of cells that aren’t epithelial or mesenchymal, but are just sort of round) aren’t very good are clinging on, and often fly out of lesions in large numbers but, being delicate souls, don’t look all that well for it afterwards, often rupturing en route.
I don’t have any pictures of preparations without many cells on because, well, there’s not a lot to look at, but here’s what happens to cells when they’re handled more roughly than they like:
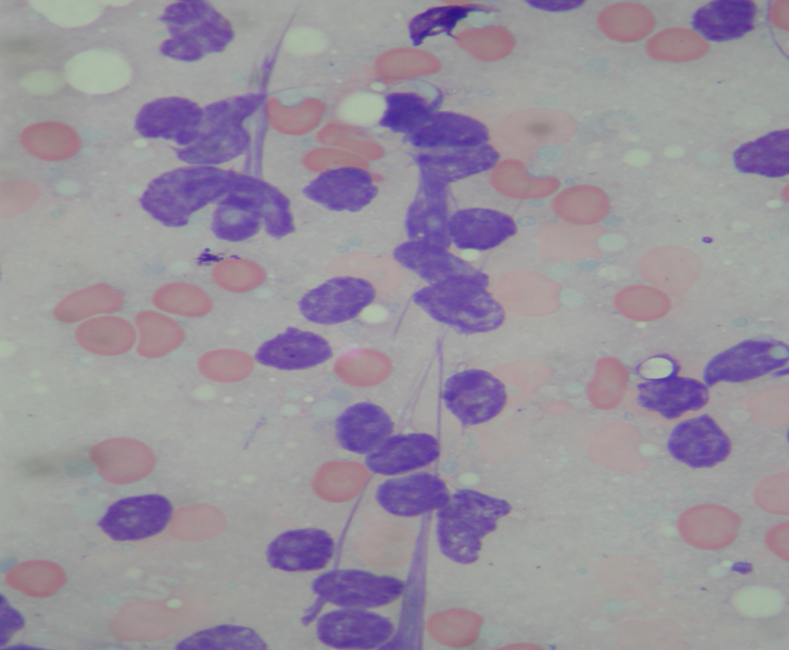
Those purple blobs might once have been lymphocytes, or epithelial cells, but now they’re just bare nuclei with their cytoplasm stripped off. I feel much the same myself, sometimes, but as a cytologist, it’s hard to come to any useful conclusions about them.
The problem is, of course, you don’t know what the cells are inside the mass before you’ve sampled it, otherwise you wouldn’t be sticking in the needle in the first place.
With that in mind, here are a few practical tips to try to get as much useful material into the needle as possible.
So, if luck was with us, we’ve managed to get a decent amount of cells up into our needle, but we’ve still got to get them back out again so your friendly neighbourhood cytologist can have a peek.
It’s relatively easy to get the material on to a slide (certainly easier than getting it out of the patient), but, in most cases, you’re going to need to spread the material out.
Tempting as it is to get everything from your syringe down on to the preparation, you’re going to enjoy better success with a smaller amount – roughly the same amount of material you’d use to make a blood smear – that is, a small blob of material that isn’t going to make it all the way off the edge of the slide when you smear it.
Cytologists need to look at individual cells to understand what’s going on, and if after your efforts you’ve managed to get huge amounts of cells on to the slide, but don’t spread them out, it’s going to look something like this:
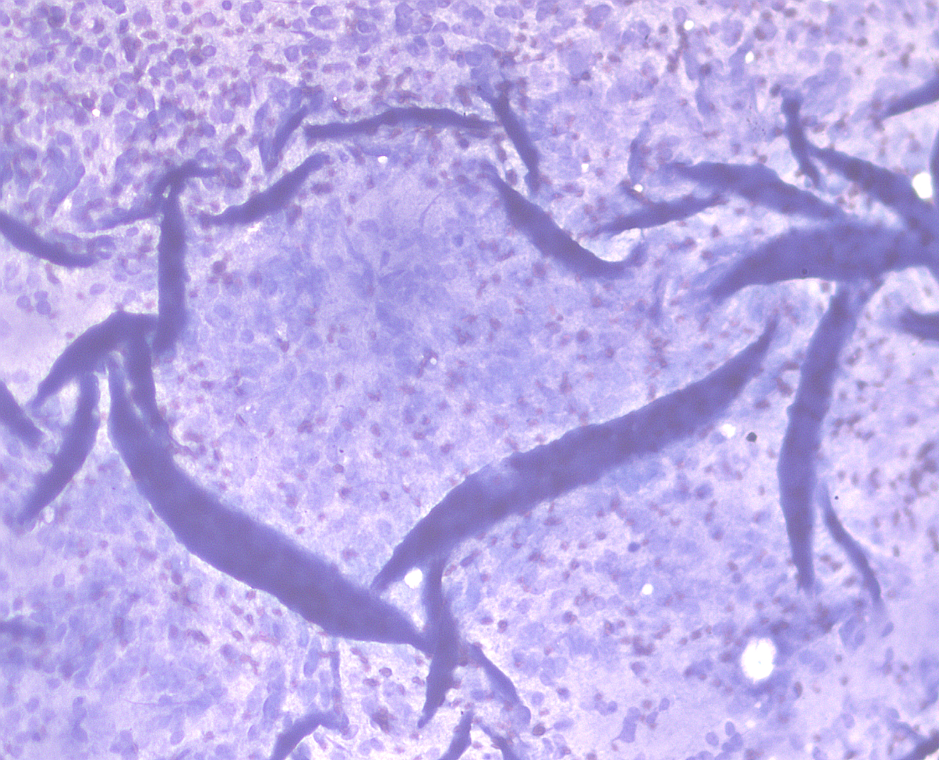
That is a big blue sheet with wrinkles and folds, and vague circles where the individual cells are.
Spreading the material out will greatly increase our chances of getting a diagnosis, so long as you do it gently enough you don’t burst everything in the process, so let’s talk about a few options.
Here’s a picture of the classic patterns we see on slides, and a few words on each:
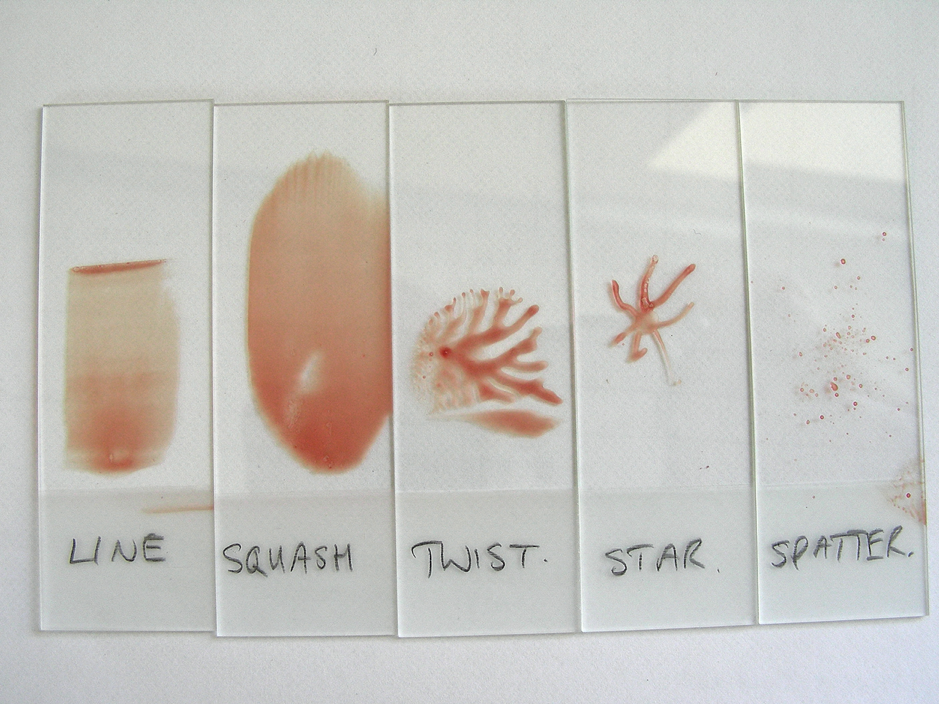
One of our preferred techniques, it involves putting a blob on the slide and gently smearing it out with another slide held over it at an angle, in exactly the same way that you would make a blood film.
It spreads things out very nicely – although, depending on the material you get and how easily it goes on to the slide, some preparations just won’t be amenable to this.
Rather than the latest dance craze, this describes another preferred technique where, after you’ve put the material on to the slide, you gently place another slide on top of it.
Don’t squeeze the slides together as this might rupture some of the cells; just let them attract each other (there’s a lesson in here about arranged marriages, but I don’t want to digress).
Once the slides are pressed together and you can see your material spreading out, you can either slide the top slide off the bottom one, or twist it and lift. Both techniques work pretty well, and you should be left with material on both slides.
Oh, not recommended, this one. It involves getting your blob of material on the slide, then sticking a needle into it and pulling it out radially, spreading the cells out. Unfortunately, it doesn’t spread them very evenly or well, and all that jiggery-pokery with the needle tends to rupture them to boot.
You can probably see how this technique got its name. It’s not ideal, as it tends to leave thick blobs of material, with cells generally only visible around the edges of these blobs.
Smearing is greatly preferred, if you can, but sometimes the specimen just splatters on to the slide, despite your best efforts, and has dried before you have a chance to smear it. If you can, make a few more and smear them – your patient’s patience permitting.