28 Oct 2019
Albane Fauron, in the first of a three-part series, discusses the background to this technology and the types available.
Albane Fauron
Job Title
Image: gearstd / Adobe Stock
Technological developments, as well as decreasing costs, are progressively making 3D printing (3DP) more affordable and accessible to the veterinary world. This article – the first of a three-part series – focuses on the history of 3DP, and offers a brief comparison of the different technologies available.
The second article of this series presents the current applications of 3DP in veterinary medicine, while the third and final part explores the latest developments in human medicine, as well as how soon those developments may become available to the veterinary world.
While 3D printing (3DP) may seem like a fairly recent development, it is a technology that has existed for almost 40 years.
In 1981, the Japanese Hideo Kodama observed that, when exposed to a UV light, photopolymer material hardens (a phenomenon known as photo hardening or photopolymerisation). From there, he hypothesised that if applied layer by layer, photopolymerisation could enable the creation of 3D parts.
Kodama wrote a pivotal paper on photopolymerisation and rapid prototyping supporting his theories and experiments (Kodama, 1981). However, due to funding issues, he was never able to fill in a patent for his technology.
In 1984, a French team of three researchers came together with the idea of building 3D objects layer by layer, instead of block by block. Similarly to Kodama, the group had noticed that when exposed to UV light, certain liquid materials can become solid.
This concept represented the core idea from which its work developed. In its early phase, without any lasers, the team had to use the sunlight to add layers on to its first object (Gaget, 2018). It eventually acquired a UV light laser, which enabled considerable progress.
While the team encountered additional hurdles along the way (such as the discovery that some materials would shrink significantly after photopolymerisation), they succeeded in printing their first 3D object after two years of research (Gaget, 2018).
The three French men filled a patent for their invention, but this was unfortunately quickly abandoned by their employer at the time (the French General Electric Company), which failed to see the business and financial potential of this technology.
Only three weeks later that same year, the American Charles Hull filled his own patent for a similar technology, which he coined “stereolitography“ (SLA). Hull was employed by a company that manufactured tough coatings for tabletops through UV light processing and had grown frustrated that the production of small plastic parts using this process could take up to several weeks (Ponsford and Glass, 2014). He imagined a more efficient process, where 3D objects would be created by successively printing and curing with UV light thin layers of material.
After months of trial and error, Hull successfully created the first SLA printer. He filed the patent for stereolitography (Hull, 1986) and, shortly after this was granted in 1986, set up the company 3D Systems to commercialise his idea. Today, files generated with the purpose of being printed in 3D carry the extension .STL, which is short for stereolitography.
SLA, as well as all the different technologies described that follow, is known as an “additive manufacturing process” – that is, it relies on the creation of a volume by adding material one layer at a time. Additive processes are in contrast with carving or sculpturing processes, in which material is removed from a pre-existing block.
Selective laser sintering (SLS) is another additive process through which 3D parts can be printed. This technology was invented and patented in 1988 by the American Carl Deckard. While SLS is based on a similar concept to that of SLA, significant differences exist between both processes.
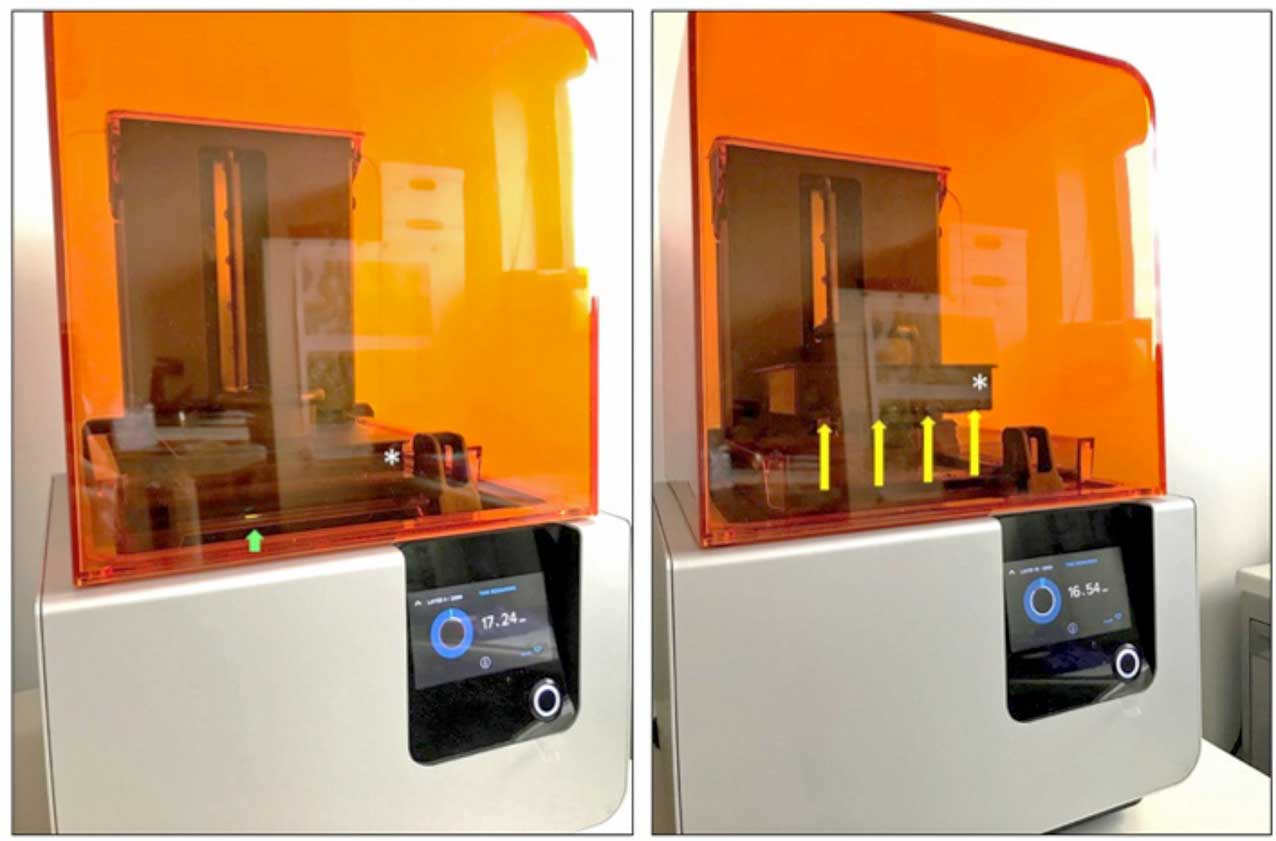
Whereas SLA uses a low-powered UV laser to solidify a liquid resin (Figure 1), SLS relies on a high-powered laser (typically a CO2 laser) to sinter (melt) powdered material: when the CO2 laser hits the powdered material, particles are bound together to form a solid material (Figure 2).

Another layer of powder is deposited on top of the now solid previous layer and the process goes on. This allows material to be made of plastic, metal, ceramic or glass (McGurk et al, 1997).
One year after SLS was patented, Scott Crump invented the third game changer in 3D printing, known as fused deposition modelling (FDM). Like SLA and SLS, FDM works by laying down material layer by layer – however, the use of a laser is obliterated. Rather, the model part is produced by extruding strings of the printing material through one or multiple nozzles.
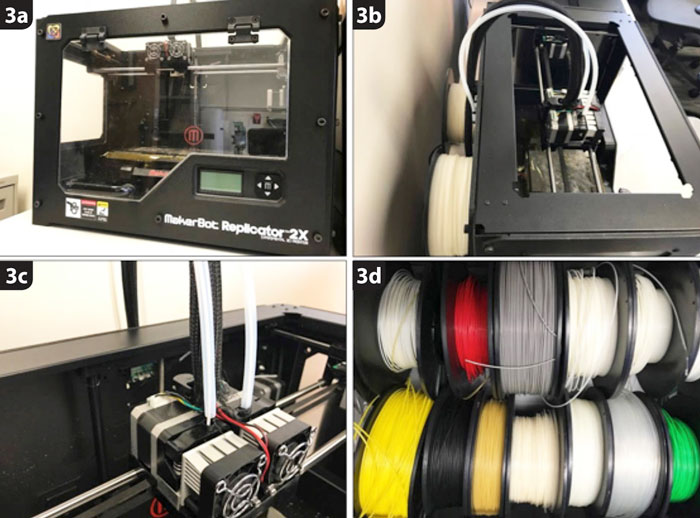
The nozzles are heated to melt the material as it is extruding. The filament of material deposited hardens immediately, and another layer can be deposited on top of it (Figure 3). In cases of printers featuring more than one nozzle, printed parts can be composed of different materials and/or colours (Hespel et al, 2014).
The different 3DP technologies presented in this article can be compared on the basis of the resolution of the parts they produce, the materials that can be printed and overall costs.
When it comes to resolution in 3D printing, one needs to consider the two planar dimensions X and Y, as well the Z dimension. XY and Z are controlled via fundamentally different mechanisms, hence talks about their respective resolution will be treated separately.
In 3DP, print quality is most influenced by the XY (or horizontal) resolution. The XY resolution is the smallest movement that a printer’s laser or extruder can make within a single layer. Roughly, it represents the maximum level of precision that can be matched between intended size and printed size of features.
Consider the following 3D model, generated via computer-aided design (CAD) software: a block containing lines of different width, ranging from 10 microns to 200 microns in 10 micron increments. Now, consider a 3D print of this same model.
The physical model will be able to exactly reproduce the CAD line’s width up to a certain extent (for example, 100 microns). Past this magnitude of 100 microns, deviations from the CAD model or defaults in the lines printed will start to appear. In this example, the XY plane has a resolution of 100 microns.
While the XY resolution is, relatively speaking, of greater relevance than its Z counterpart, it is this latter specification that continues to receive the most attention as a major numerical differentiation between 3D printers. The Z resolution is the layer thickness.
While early printers struggled to break the sub-millimetric thickness layer, many printers now routinely achieve Z resolutions as low as 25 microns. However, the relationship between print thickness and print quality is not a linear one: thinner layers do not always result in better prints. Logically, thinner layers equal more repetitions, which in turn increases the chance of print failure (assuming a failed layer causes total print failure).
Additionally, thinner layers are typically advantageous in cases of models that comprise complex features and diagonal transitions. In such cases, decreasing layer thickness will result in prints of substantially better quality. However, if a model can be built entirely out of vertical and horizontal edges, layer thickness becomes irrelevant. Last but not least, decreasing layer thickness substantially increases printing times.
In FDM printers, the XY resolution is a function of the nozzle size, as well as the precision of the extruder(s’) movement. The most common nozzle diameter is 0.4mm. It should also be noted that nozzle size affects maximum layer height: FDM printers cannot print layers that are thicker than the size of the nozzle. The generally accepted rule of thumb is that maximum layer height should not exceed 80% of nozzle diameter – for example, for a 0.4mm nozzle, layers thicker than 0.32mm carry a greater risk of failure (secondary to poor layer adhesion; Obhudo, 2018).
SLA and SLS enable superior resolution and accuracy when compared to FDM. Moreover, in FDM printers, the bonding forces between the layers are weaker than with SLA and SLS printers. Consequently, when printing medium or large size models, the weight of the upper layers may stress the layers below to an extent that may cause different printing problems (misalignment, shrinking of lower parts and so on). Tall and thin prints are at a greater risk of failing because they are more easily deformed by the heat generated in FDM printers (Redwood, 2019).
In contrast, resolution of SLA printers is a function of the size of the laser, which enabled XY resolution around 150 microns. Moreover, SLA printers typically print models and supports upside down, meaning the first and “lower” layers are subject to less stress and forces, helping with model smoothness. A second advantage of SLA over FDM printers is the considerable improvement in layer thickness, with benchtop SLA printers being able to print layers between 25 microns to 100 microns in thickness (Cain, 2018).
As aforementioned, SLS printers use a high-powered laser to fuse particles of powder, enabling XY resolution similar to those of SLA printers. Layer thickness is similar to that of SLA printers (80 microns to 100 microns average). In SLS, bonding forces between layers are excellent and enable the production of models with isotropic mechanical properties (that is, properties are the same in every direction). Models printed from SLS printers are about 30% porous, which gives them a typical grainy surface finish and decreasing model smoothness (Varotsis, 2018).
In summary, SLA parts have the highest resolution and accuracy, as well as the clearest details and smoothest surface finish of all 3D printing technologies presented here. However, other factors need to be considered when deciding which type of 3D printer may best suit one’s needs.
FDM printers work with a wide range of standard thermoplastics, such as:
SLA machines print models from photosensitive liquid resins. Today, manufacturers have created innovative SLA resin formulations with a wide range of optical, mechanical and thermal properties. For example, Formlabs – which manufactures the high-end Form 2 SLA benchtop printer – offers more than 10 types of printable resins compatible with their SLA printers (clear, tough, castable, flexible and so on). The best type of resin to use will depend on the application(s) of the printed part.
The most common material used in SLS printers is nylon, which, as aforementioned, has excellent mechanical properties. While FDM printers use nylon filaments, this material can easily be processed as a powder as well. Other thermoplastics used by SLS printers include polystyrenes and thermoplastic polyurethane, which, unlike nylon, is transparent and elastic.
A variation of SLS printing is called selective laser melting (SLM). This process belongs to the powder bed fusion printing family, but was given a slightly different name to emphasise the difference in the key processes that exist between SLS (sintering) and SLM (melting).
SLM printers are able to melt metal powder particles, and produce parts from a wide range of metals and metal alloys, including aluminium, stainless steel, titanium and cobalt chrome.
Beyond resolution and printable materials, costs and return on investments are also significant variables to consider when comparing different types of printing technologies. While equipment costs are important, materials and labour costs also influence cost per part (Table 1).
| Table 1. Fused deposition modelling (FDM) – stereolitography (SLA) – selective laser sintering (SLS) comparative table based on costs, and pros and cons of the different technologies | |||
|---|---|---|---|
| FDM | SLA | SLS | |
| Equipment | £2,500 to £12,000 | £2,800 to £65,000 | • Industrial printer starts at £155,000. • Benchtop system (soon available) will start at approximately equal to £7,800. |
| Material | £30/kg to £150/kg | £120/L to £160/L | £80/kg |
| Time and labour | • Manual support removal if no soluble supports. • Visible layer lines typically require post-printing processing. |
• Washing printed parts in solvent +/− UV curing depending on resin. • Post-printing processing to remove support marks. |
• Grainy surface finish and internal porosity require post-printing processing. |
| + | • Most cost-effective way of producing prototypes. • Wide range of thermoplastic materials available. |
• Highest dimensional accuracy (suitable for parts with intricate details). • Wide range of SLA materials available. |
• No support required: conducive to printing of complex geometries; simple cleaning to remove excess powder. • Good mechanical properties (ideal for functional parts/prototypes). |
| − | • Lowest dimensional accuracy and resolution (not suitable for parts with intricate details). | • Mechanical properties and visual appearance of parts will degrade over time (especially when exposed to UV light). | • Availability limited to industrial systems. • Inability to accurately print large flat surfaces and small holes. |
FDM mid-range desktop printers, such as the MakerBot Replicator, start at around £2,500, while industrial level machines can range up to £12,000. Spools of PLA or nylon filament cost around £30/kg. FDM parts are printed with supports that enable stabilisation of the part as layers are added.
These supports need to be removed manually, which can be time and labour consuming. Spools of support-specific hydro-soluble materials exist, but can be costly (£150/spool). These costs may, however, be cancelled out by the time gained by obliterating manual removal of supports. High-quality finishes (such as sanding and polishing, priming and painting, epoxy coating and so on) typically require lengthy post-processing, which again, may add to final costs.
Professional desktop SLA printers, such as the aforementioned Formlabs Form 2, are slightly more expensive than their FDM counterparts, starting at around £2,800. Large-scale industrial machines typically cost around £65,000. Most standard and engineering resins cost around £120/L to £160/L.
Similarly to FDM parts, SLA parts are printed with their supports, which will need to be removed. Following printing, parts typically need to be washed in a solvent bath for several minutes, regardless of the resin used. This step enables the removal of any excess liquid resin from the part’s surface and cavities.
The type of solvent to use (for example, isopropanol) will depend on the printer, as well as the manufacturer’s recommendation, and will need to be changed regularly as it will progressively become saturated with liquid resin. In addition to this, certain resins require curing with a UV light to reach their maximal mechanical properties.
Immediately following printing, an SLA part is in what is called a “green state”: while the part is in its final form, polymerisation is not yet fully complete, and the part is displaying weaker mechanical properties. For certain resins, curing with heat and UV is a crucial step for parts to exhibit full strength and optimal properties.
While washing parts in a solvent and UV curing can be automated, they do represent additional costs. The Form Cure, for example (the UV curing counterpart to the aforementioned FormLab Form 2), represents a £550 investment.
So far, SLS printers have been limited to industrial applications and have been cost-prohibitive (the entry cost of a single printer is around £155). When compared to FDM and SLA, SLS represents a more complex technology, which needs to be handled in a more demanding, specific setting. Even the smallest industrial printers need a minimum of 10m2 installation space. In addition, SLS systems require to be installed in an environment free of any gases that may precipitate powder oxidation. Because of cost and complexity, the use of SLS printers has so far been limited to the production of small quantities of high value custom parts.
Nylon and other associated thermoplastic composites enable the printing of functional, long-lasting versatile parts, with mechanical properties comparable to parts produced through conventional manufacture processes, such as injection moulding. At £80/kg, Nylon is one of the cheapest raw materials available. In addition, the lack of printing supports in SLS – along with the fact excess powder can be collected, filtered and reused – produce minimal waste. Finally, SLS is the fastest additive manufacturing technology available for the production of functional, durable prototypes.
The large build volume associated with industrial printers enable high productivity and output. Post-printing processing and associated costs are minimal.
While SLS has so far been limited to the industry, commercialisation of the first benchtop SLS printer (£7,800) is planned to take place in the upcoming months.
In conclusion, 3DP can be seen as an umbrella term encompassing a range of different technologies (SLA, SLS and FDM). While 3DP has existed for almost four decades, recent developments, as well as lowering costs, have made it gradually more accessible to both human and veterinary medicine.
The second article of this series reviews the applications of 3DP in veterinary medicine.